Home > SIMION FAQ SIMION 8 FAQ for CPOTS
New
GEM file commands (extensions in v. 8.2) and syntax
Excel VBA Reference
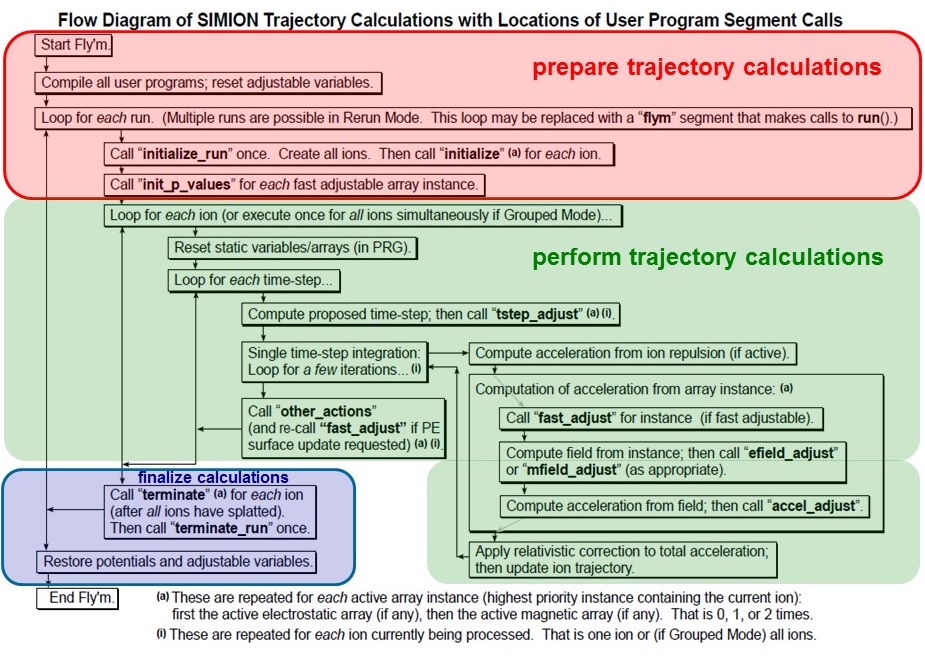
SIMION user programming flow-chart (from Christoph
Lemell's Advanced SIMION lecture AS2-3).
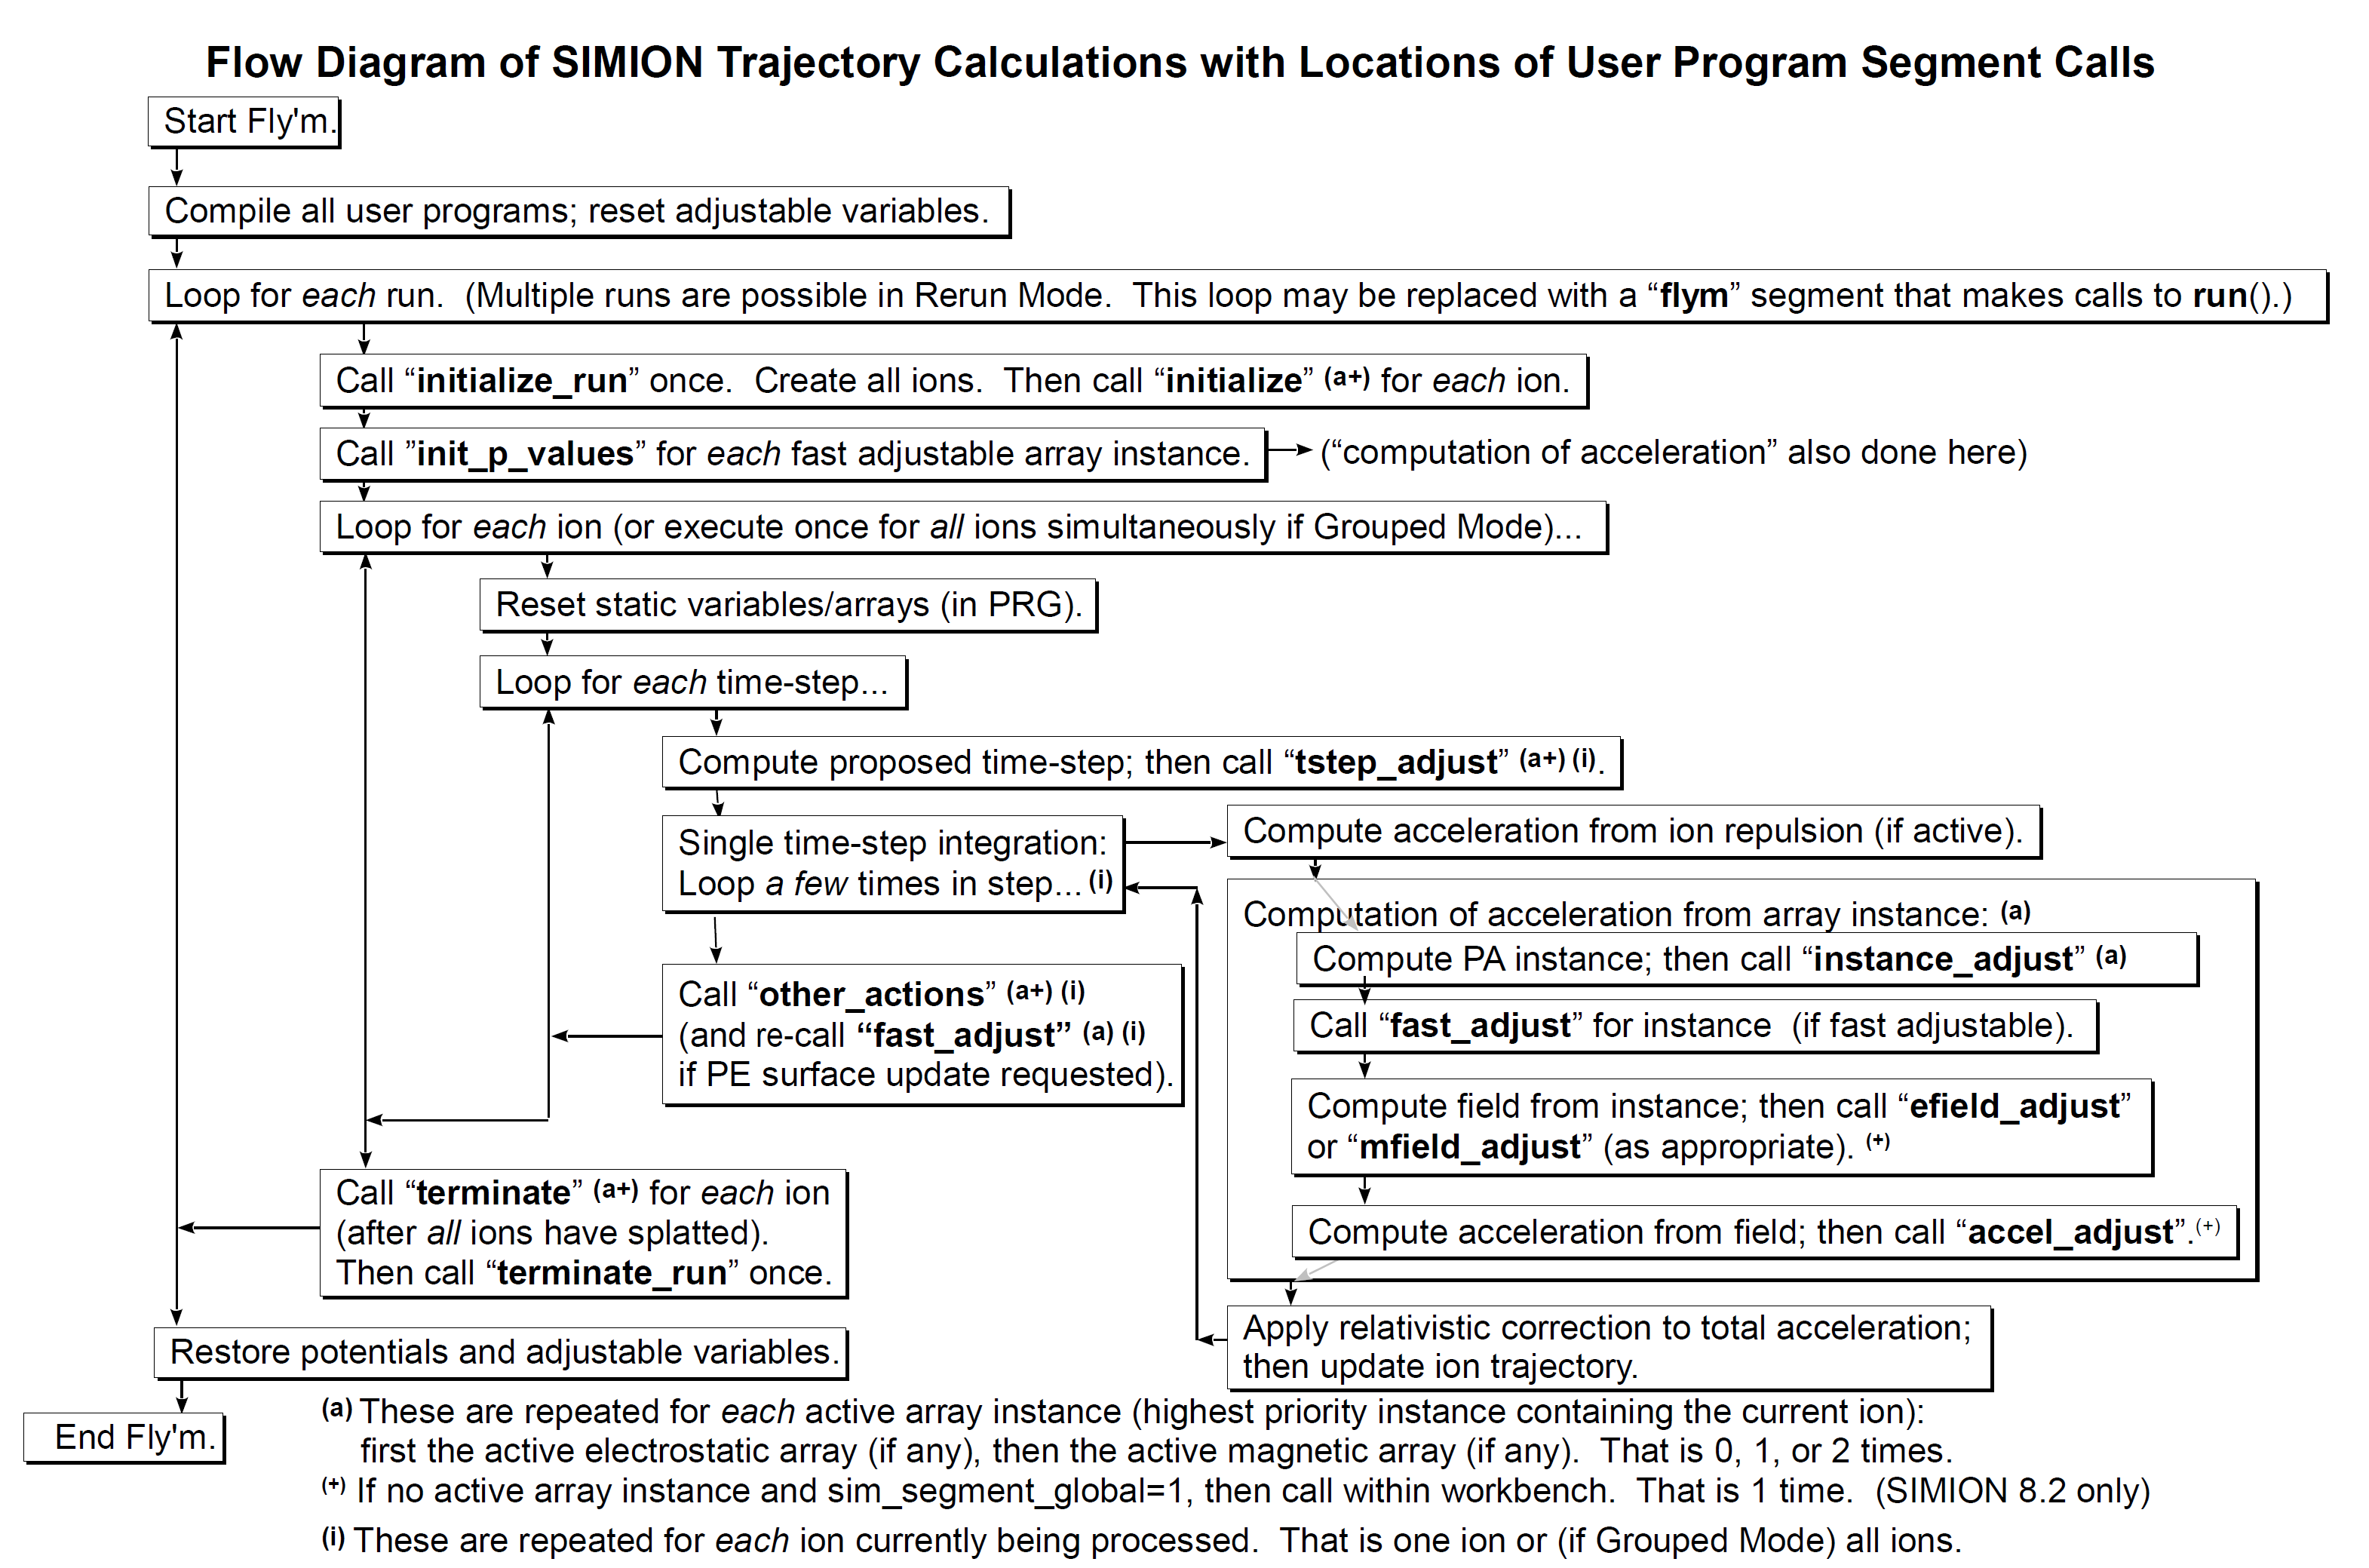
A more recent update (March 2017) can be seen below:
Example of how a user defined adjustable parameter obtains its value:
- You click Fly'm.
- The top-level of the Lua program is run, which defines adjustable
variables (e.g. "adjustable value = 1" ) and defines segments.
- Values from the Variables tab are copied to/from the adjustables
in the program. So, if for example you set "value" to
3 from the Variables menu, it gets set in the program here.
- Next segments get run. Let's say now your segment initialize_run
sets "value = 2" here. Since step 4 always overrides step 3 "value=2"
from here on until the whole Fly'm is executed.
SIMION IOB coordinate system and angular conventions
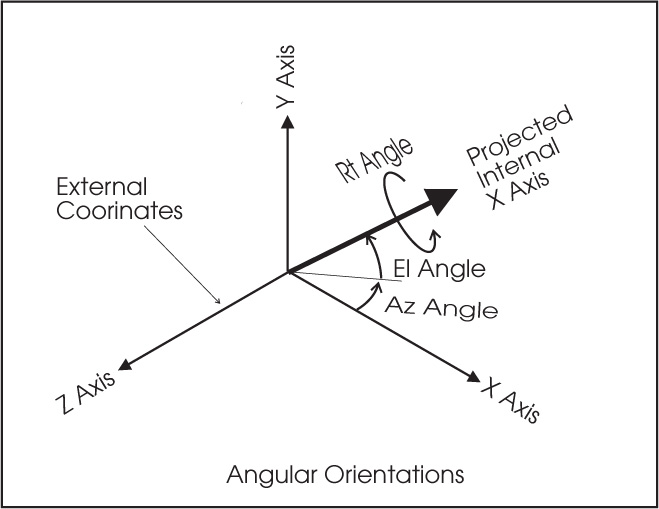
From immediate inspection of the above figure we get for a general
vector A (Ax,Ay,Az):
Ax = A cos El cos Az
Ay = A sin El
Az= -A cos El sin Az
From which we can in general compute angles El and Az as:
tan Az = -Az/Ax,
tan El = Ay/sqrt(Ax^2+Az^2)
The values of A, Az and El can be computed by the following lua
code rect3d_to_polar3d_rad (x,y,z) where in general (x,y,z) can
be replaced by (Ax,Ay,Az)
How to obtain angles Az and El from position vector r (x,y,z)
-- similar to the simion function but in radians
function rect3d_to_polar3d_rad (x, y, z)
  local r = math.sqrt(x*x + y*y + z*z)
  local az
  if z ~= 0 or x ~= 0 then
    az = math.atan2(-z, x)
  else
    az = 0
  end
  local r2 = math.sqrt(x*x + z*z)
  local el
  if y ~= 0 or r2 ~= 0 then
    el = math.atan2(y, r2)
  else
    el = 0
  end

  return r, az, el
end
Useful SIMION tricks and other hard to find info.
Examples of parametrized gem files:
See SIMION Exaples:
- examples/einzel/einzel_param.gem
- examples/spectrum/ppa2d_slits.gem
- examples/field_emission/fe_geom.gem
- examples/geometry_optimization/mesh_size.gem
- examples/geometry/sphere_aniso.gem
- examples/geometry/turning_quad.gem
- examples/kingdon_trap/ kingdon_2dc.gem
- examples/kingdon_trap/quadro_logarithmic_macro.gem
- examples/kingdon_trap/twocylinder_1dc.gem
- examples/quad/quad_include.gem
For more information see also:
How to draw/markout a line or
point in View (can be used to show a reference line such
as test plane or other or just place a mark at some important reference
point)
simion.experimental.plot_line_segment(
x1,y1,z1, x2,y2,z2, v1, v2, color1, color2, mark)
This function plots a 3D line segment using the same mechanism that SIMION
uses to draw trajectories. The given line segment is immediately drawn on
the View screen GUI (if trajectory viewing or GUI mode is not suppressed)
and/or written to any trajectory file (trj\*.tmp or .kept_traj) for future
re-display (if trajectory retaining is not suppressed).
You may use this function to plot
trajectories calculated outside of SIMION or simply to draw lines on the screen
(applications include drawing custom field/contour lines and drawing boundaries
of otherwise invisible objects like gas flow arrays).
The line segment is plotted from point ``(x1,y1,z1)`` to point ``(x2,y2,z2)``
in workbench coordinates (mm).
The two points are also given potentials ``v1`` and ``v2``
respectively (used only for PE surface views, in the vertical axis).
The two points are also given color indices ``color1`` and ``color2``
respectively. If trajectories are drawn as lines (not dots), then the
line is drawn with color ``color1``. If trajectories are drawn as dots, then
during the animation point 1, which is assumed to have been previously
drawn with color ``color1``, is erased and point 2 is then drawn with color
``color2``. (The erasing is done with "XOR" painting, which will not fully
erase if ``color1`` is not correctly specified.)
If ``mark`` is ``true``, then a marker is drawn at the first point. The marker
is drawn using the global marker color (which is set via the color in
Time Markers on Particles tab in View screen and cannot currently be
changed programatically). A marker color of 15 takes special meaning: the
marker is drawn using the line color (``color1``).
``x1,y1,z1, x2,y2,z2, v1, v2`` are real numbers. Presently they must be finite
(not +-math.huge or 0/0).
color1, color2 are integers from 0 (black) to 15 (transparent).
mark is a boolean (true, false).
``x2,y2,z2`` if omitted (nil) default to ``x1,y1,z1``.
``v2`` if omitted (``nil``) defaults to ``v1``.
``color2`` if omitted (nil) defaults to ``color1``.
``mark`` if omitted (``nil``) defaults to ``false``, unless if ``x1,y2,z2`` are also
omitted, in which case it defaults to ``true``.
Note: ``plot_line_segment(x1,y1,z1)`` will plot a marker at the given point.
GUI Library (simion.experimental.dialog)
See link at GUI Library (simion.experimental.dialog)
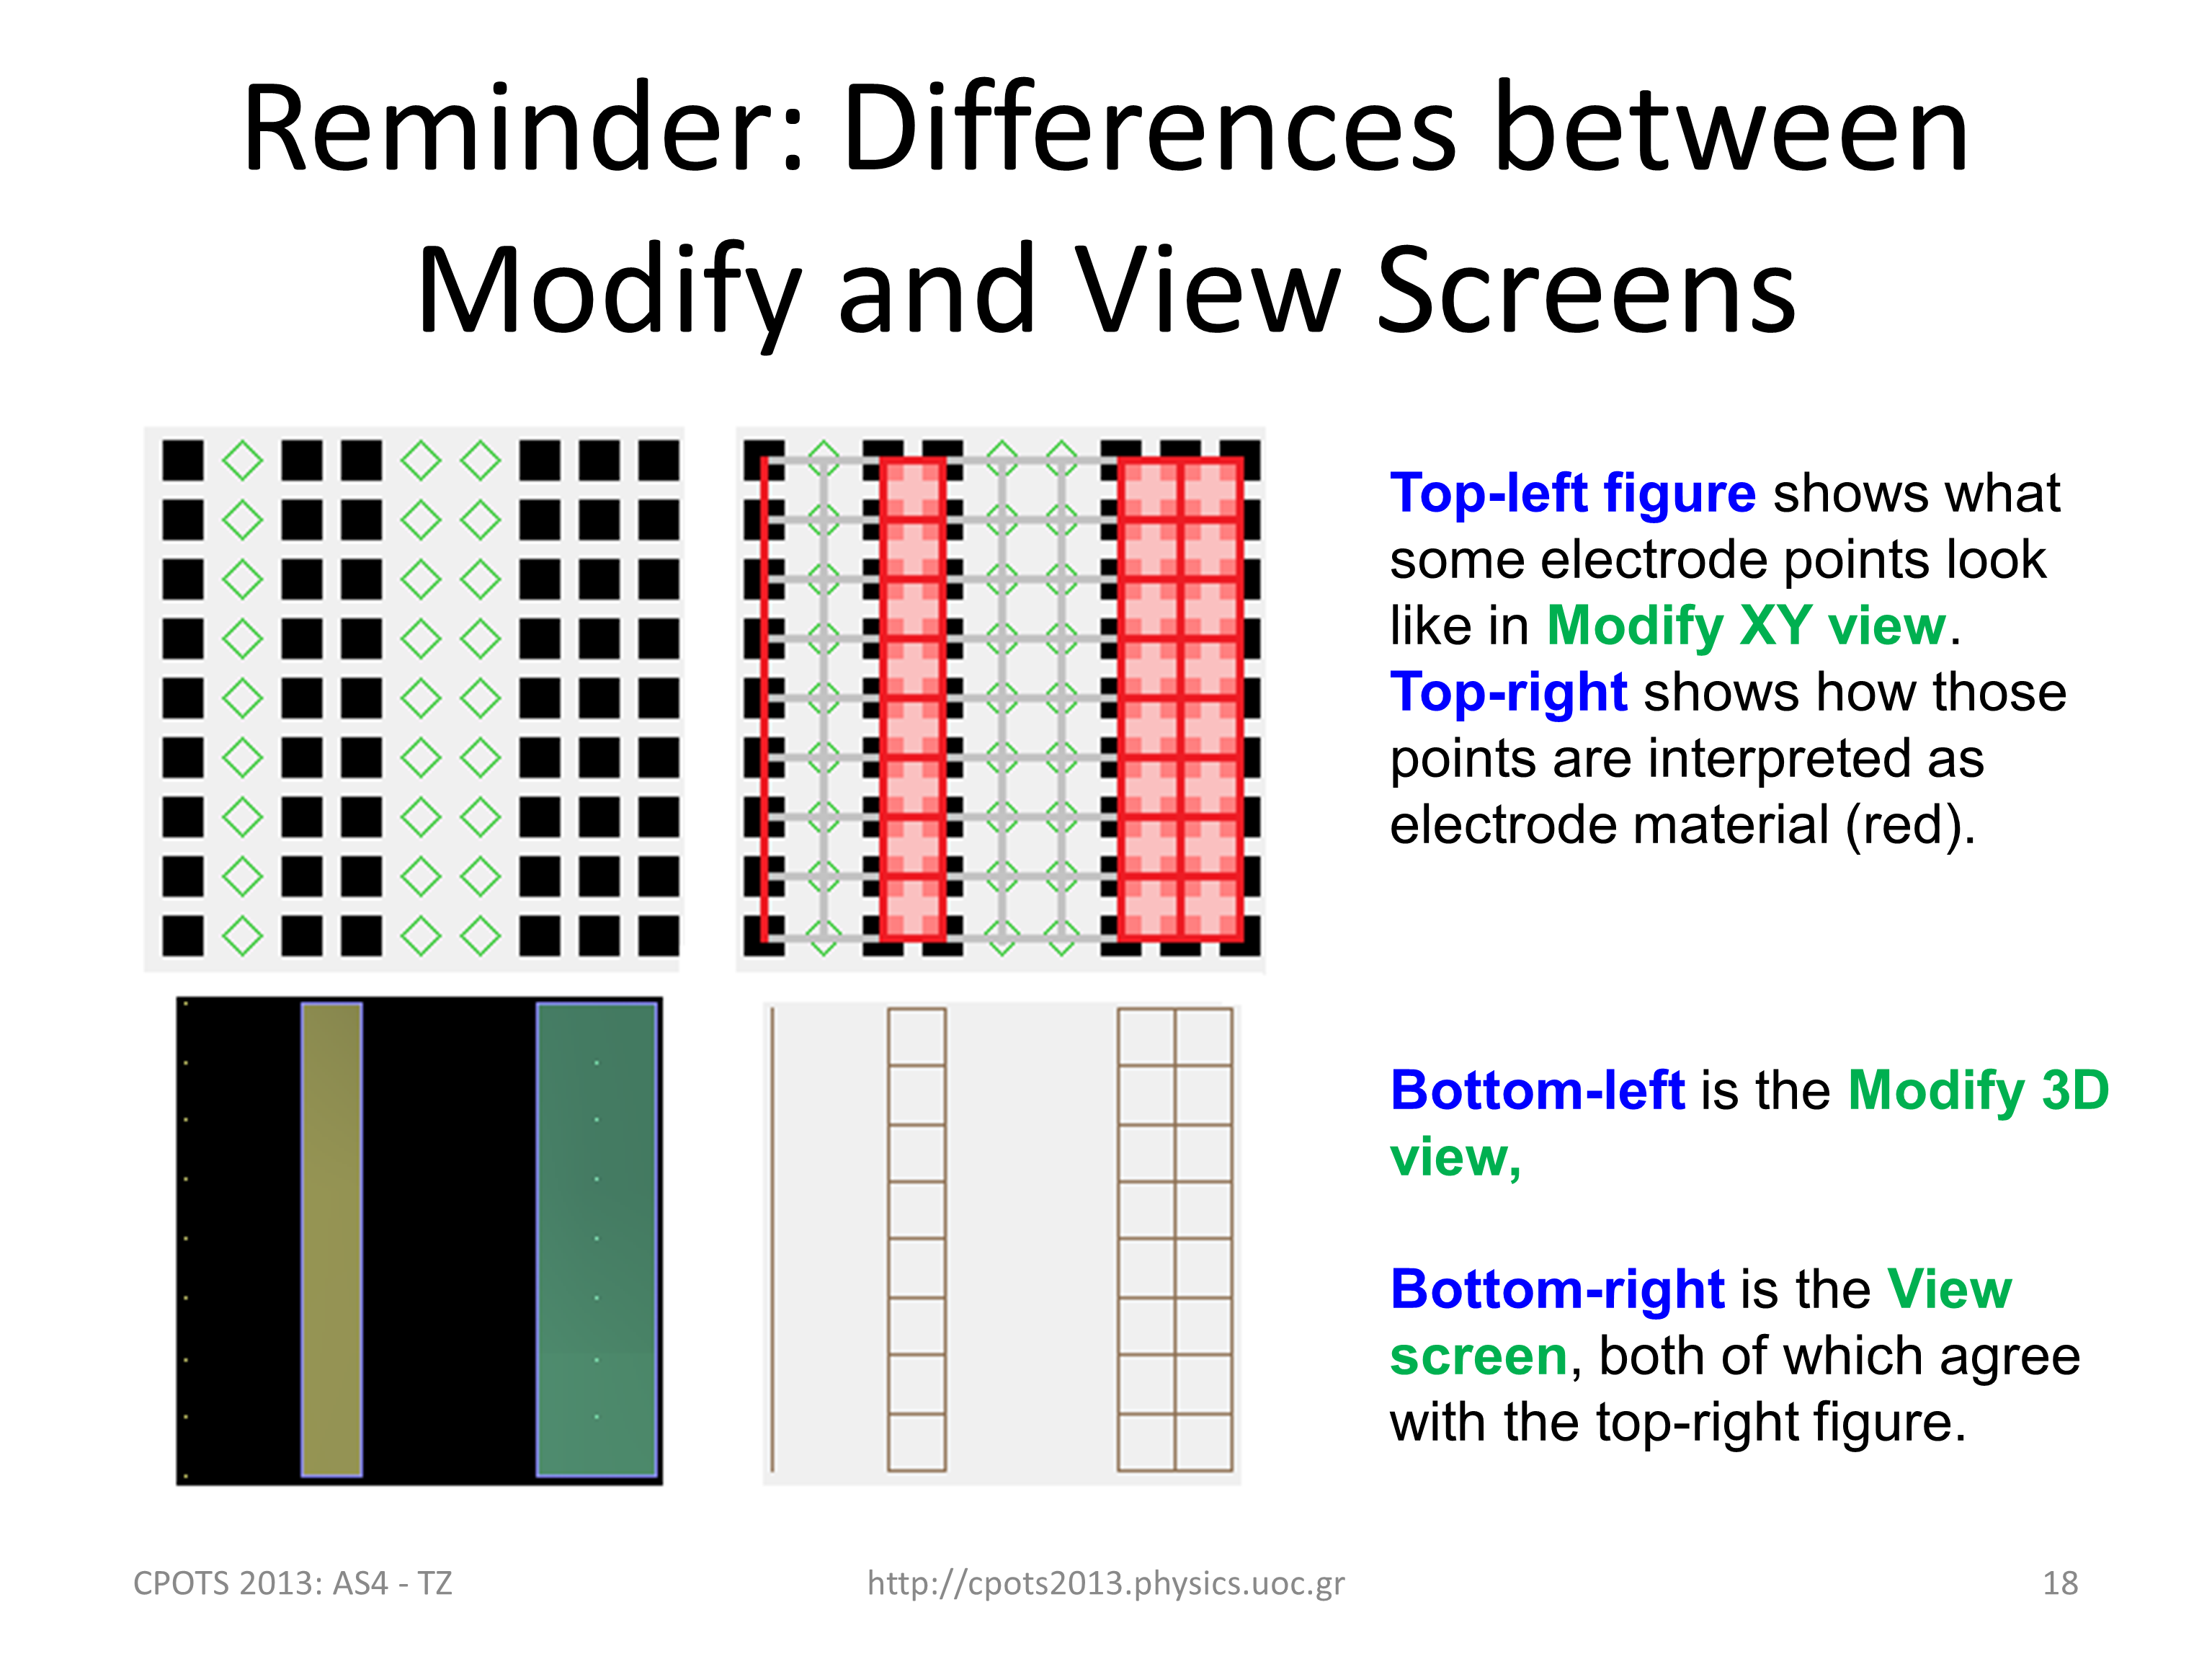
Differences in the way electrodes
are displayed in Modiy and View screens
Define Pa with surface=fractional
# d_mm = 0.1         -- mm/gu
# local W = 51	     	-- mm width of plates
# local Lx = 258.6    -- mm length in x direciton
# local Ly = 114.6    -- mm length in y direction
# local Lz = W/2	      -- half of width of ppa's (W/2 - see ppa1, ppa2)

# local nx = round(Lx/d_mm)+1
# local ny = round(Ly/d_mm)+1
# local nz = round(Lz/d_mm)+1

pa_define($(nx),$(ny),$(nz), planar,surface=fractional,z, electrostatic,, $(d_mm))
Above example using parametrization. d_mm gives the grid density in
mm/gu.
With surface=fractional, voltages defined on any electrode points
are taken as precise boundary conditions to Laplace. Furthermore,
red bars near electrode points assume the potentials of the nearby
electrode points. That doesn't quite do for infinitely thin electrodes
between grid points. As a workaround, you can make the electrode
have finite thickness (0-1 gu maybe), and if it only overlaps a
single row of grid points, it will allow particles to pass through
in Flym (presently Flym ignores red bars and only looks at electrode
points), but then fields in only one side of the electrode would
be highly accurate.There's nothing preventing Refine from doing
this better; it's just a matter of representing it in the PA.
How to make the editor opening lua files in SIMION to use a particular user defined editor (e.g. SCITE) in Win 7
Define a new Win 7 Enviroment variable SIMION_EDITOR and set it
equal to the path of the desired exe, e.g.
SIMION_EDITOR = C:\Program Files\SIMION-8.1\simion-editor-20121229\SciTE.exe
To define the Environment variable in Win 7 follow directions at:
http://www.itechtalk.com/thread3595.html
To run lua code (e.g. The lua
program in a file named test.lua) from the SIMION command bar:
Type in the command bar the following:
dofile 'test.lua'
Make sure the file test.lua is in the active directory
To activate a new update in the Simion directories:
For example if you want the new version of Statistics.lua to become
active [after placing it in the appropriate SIMION directory (..\lib\lua\simionx)],
you have to restart SIMION or enter this into the SIMION command bar:
package.loaded['simionx.Statistics'] = nil
Using the lua SC editor tab to indent
blocks of code
Highlight the block of code and then press either TAB or SHIFT+TAB.
And Options|Change Indentation Settings controls tab style.
How to ensure 1gu transparency
(mesh) in a variable density gem file
Just make the mmgu a variable and use it for the width, more of less like this:
# local mmgu = 0.1  -- mm per grid unit
pa_define(............., $(mmgu))
e(1) { fill { within { box2d($(10-mmgu/2),0, $(10+mmgu/2),5) } } }
Example to load a particular fly
(fly2, ion etc) file from lua rather than have to do it manually?
The simion.experimental.add_particles is the 8.2 early
access function that does something like this. It's demonstrated
in examples\child_particles (latest version). However, this defines
a FLY2 definitions within the current Lua file not from an external
FLY2 file.
See also examples\random_fly2
Save the whole trajectory screen
automatically to some file via lua at the end of the fly?
See examples\geometry_optimize\tune.lua
 -- Print image of screen to file.
     simion.printer.type = 'png'  -- 'bmp', 'png', 'jpg'
     simion.printer.filename = 'output/result_' .. dx .. '.png'
     simion.printer.scale = 1
     simion.print_screen()
dx is any variable that differentiates one result from the other.
Make sure the "output" directory exists.
How to define a Gaussian distribution in fly2 file:
   f=simion.fly2.gaussian_distribution{mean=0,stdev=1}
   for i=1,20 do print(f()) end
Using the iterator method to define a distribution in fly2 file:
local position = simion.fly2.circle_distribution {center =
 simion.fly2.vector(82.55, 0, 28, normal = simion.fly2.vector(0, 0, -1),
 radius = 0.8,fill = true}:iterator()


local p = position()
print(p[1], p[2], p[3])
How to define a Lorentzian distribution in fly2 file:
It can be done by editing the FLY2 in a text editor:
-- http://en.wikipedia.org/wiki/Cauchy_distribution
local function lorentz(mu, phi)
  return distribution(function()
    return mu + phi*math.tan(math.pi*(rand() - 0.5))
  end)
end


particles {
  standard_beam {
    n = 100,
    mass = 10, charge = -1,
    ke = lorentz(100, 1)
  }
}
See http://simion.com/info/fly2_file.html for more information about generating fly2 files in lua
Greek characters in Lua for use in Excel plot titles and other
Unicode characters can be inserted by specifying their UTF-8 byte encoding,
as shown below (for γ, which has Unicode U+hex notation U+03B3 and UTF-8 code unit byte encoding
hexidecimal "CE B3"). One tool to obtain the "UTF-8 code units" for a character
is http://rishida.net/tools/conversion/ .
The Windows Character Map (charmap.exe) program can help in finding Unicode symbols with U_hex notation.
See the following common examples:
local C_alpha = string.char(0xCE, 0xB1)  --α
local C_beta = string.char(0xCE, 0xB2)  --β
local C_gamma = string.char(0xCE, 0xB3)  -- γ
local C_Alpha = string.char(0xCE, 0x91)  -- Α
local C_Beta = string.char(0xCE, 0x92)  -- Β
local C_Gamma = string.char(0xCE, 0x93)  --Γ
local C_Delta = string.char(0xCE, 0x94)  -- Δ
local C_plusminus = string.char(0xC2, 0xB1)   -- ±
local C_deg = string.char(0xC2, 0xB0) -- °
Different color markers for different
fly groups in the same fly:
In the Particle tab - Trajectory display change the
color time marker to 15 (white). Then the markers use the color
set for the trajectories in the Define initial fly parameters.
Regenerate PA's if dimensions
in GEM have changed:
The Lua command regenerate()
can be given either via a lua program or by giving this command
in the command line of SIMION. This is useful in the case you have
modified a gem file and then want to save it and refine it. The
regenerate() command does exactly that. It works only in the View
screen environment not Modify.
Potential Array (PA) Scaling in GEM files
See link Potential
Array (PA) Scaling
PA size
It's 8 bytes on disk and 10 bytes in RAM.
At each point in the PA, the potential is stored using
a double precision floating point value, which is 8 bytes. In addition
SIMION needs to store whether that point is an electrode or non-electrode.
Sometimes it stores that 1 bit of information within the same double
precision floating point value. At other times it is more efficient
to store it separately. SIMION maintains an extra 2 byte integer
for this purposes and other purposes (e.g. when refining).
Page F-7 in the manual shows the format in which PA's
are stored on disk. The pa files are NOT ASCII files!
Selectively refining a single
pa without opening the SIMION gui
Give the following command to refine electrode number
11 with convergence criterion 1E-7 from the simion.exe directory
speficying the path where the example pa (here tanden.pa#) lies.
simion.exe --nogui lua -e "local pa = simion.pas:open('simion.exe
--nogui lua -e "local pa = simion.pas:open('D:/SIMION/tandem_d_mm=0.1/tandem.pa#');pa:refine{solutions={11},
convergence=1e-7}"
to also crop right after:
simion.exe --nogui lua -e "local pa = simion.pas:open('D:/SIMION/tandem_d_mm=0.1/tandem.pa#');
pa:refine{solutions={11}, convergence=1e-7};
pa:crop(0,0,0, 99,10,0);
pa:save()"
Cropping pas to cut down on RAM usage
Cropping a pa via Modify function in SIMION
With the pa (.pa0 or .pa) already refined in SIMION you
may go into the Modify function and use the cursor to define cropping
regions in the 3-D gu volume. Make sure you also save the original
uncropped pas for future use.
If you crop the .pa0 then this will automatically also crop the associated .pa_i (i=1,2,3,...)
Cropping a pa via lua control
simion.pas:close() 		-- equivalent to button Remove All PAs from RAM - clears all pas before the next command.
local pa = simion.pas:open('HDA.pa0')		-- loads the pa0
pa:crop(0,0,0, 1270,71,1150, true)		-- crops - see the crop command in simion manual for more details
The above 3-line lua code can be placed in a file with extension
.lua (for example crop.lua) and run from SIMION by name from the
SIMION button "Run Lua Program"
You may also crop without opening the SIMION gui:
local pa = simion.pas:open('drag.pa#')
pa:refine{solutions={0}, convergence=1e-7}
pa:crop(0,0,0, 99,10,0)
pa:save()
Adding a la carte contours of potential or electric fields via lua and with different colors
See example below:
simion.wb.contours = {
    potentials = {
      {value=100.0; color=1};
      {value=110.0; color=1};
      {value=120.0; color=5};
    };
    gradients = {
      {value=20.0; color=2};
      {value=30.0; color=2};
    };
  }
Change the size of the marker:
Use the "Size" field on the Trajectory Display panel on Particles tab to increase the marker size.
Screen dump of particular SIMION
window view only: Put cursor on window of interest click
and then hit
ALT+PrintScr
Lua control of electrode voltages
in different instances in the workbench:
Answer: use the ion_instance reserved variable
to differentiate electrodes with same number but in different instances.
For example:
simion.workbench_program()
function segment.fast_adjust()
  if ion_instance == 1 then
    adj_elect01 = 20
    adj_elect02 = 30
  elseif ion_instance == 2 then
    adj_elect01 = 20
    adj_elect02 = sin(ion_time_of_flight)
  end
end
For more information see How
can a fast_adjust segment control electrodes in multiple arrays?
Lua control of active instance in the workbench:
There's a new "instance_adjust" segment, which allows you to re-order
PA instance priorities during a Fly'm. Example:
simion.workbench_program()
simion.early_access(8.2) -- needed for instance_adjust
function segment.instance_adjust()
  if ion_instance == 2 then
    if ion_px_mm > 10 then
      ion_instance == 0  -- suppress
    end
  end
end
That causes PA instance #2 to be invisible in the region x > 10 mm, effectively
allowing particles to instead see any fields from any lower PA instances
(i.e. #1). This can be useful in examples like "bender_cut" where
a system is modeled by two PA's that partly overlap in the case
when the boundary conditions at the end of the arrays might not
be realistic--you can cut-off the end of those arrays. One way to
do that is with the "Crop" function on the PA itself. This instance_adjust
segment provides an alternate approach which doesn't touch the PA
file and is more flexible in defining the shape of the region to
mask out. Yet another way to achieve this is by overriding the efield_adjust
segment as shown in the first link below, but that is can be less
clean.
Further details at:
It is available in SIMION 8.2 early access 20170214 or above (previewable
in 8.1.3.0-TEST on Check for Updates). This segment can be useful
for systems with multiple PA's that partly overlap.
The topic can be found at http://simion.com/discuss/topic/1846-ann-segmentinstance-adjust-change-pa-priority-in-flym/?view=getnewpost
To add lua code in gem files:
Example of if statement in gem file:
# if x == 1 then
e(1) { fill { within { circle(0,0,10) } } }
# else
e(2) { fill { within { circle(0,0,10) } } }
# end
You can even define your own functions for reusable shapes.... Something like
# function mybox(x,y)
    e(1) { fill { within { box($(x),$(y),$(x+1),$(y+1)) } } }
# end

# for i=1,10 do
  $(mybox(i*10,0))
# end
http://simion.com/info/gem_geometry_file.html
mentions some of this but not all possible usage.
Lua control of Display and Rerun in Particle
Menu:
sim_retain_trajectories (which controls both Retain and Display of trajectories), but you could just do "sim_rerun_flym = 1" at the top of the flym segment which also has that effect.
For Loops in Lua:
Use only integers in for loop or do this:
for gloop=g_start,g_end+g_step/2,g_step do
				... code ...
end
Histogramming/binning routine in lua:
The "simionx.Statistics" library (see Help file) computes a histogram (i.e. binning). examples\plot\tof_histogram.lua uses it.
Lua code to print out values of potential at fixed z=0 and variable radius and angle:
-- test.lua
--local pa = simion.wb.instances[1].pa
local pa = simion.pas[1]
local z = 0
for r=0,10,2 do
  local s = ""
  for t=0,math.pi, math.pi/16 do
    local x = math.cos(t) * r
    local y = math.sin(t) * r
    local v = pa:potential_vc(x,y,z)
    s = s .. "\t" .. v
  end
  print(s)
end
To compare values of SIMION pa and theory:
In the main (opening menu page of SIMION) Remove All PAs from RAM and load the ".pa0" file of your pa.
Then enter the following into the bottom SIMION command bar:
pa=simion.pas[1]; for y=30,60 do print(y, pa:potential(0,y,0), 0+((-600)-(0))/ln(60/30) * ln(y/30)) end
The output you get will look like this:
30        0        0
31        -28.380277755053        -28.383428867014
32        -55.859687813145        -55.865642634889
33        -82.493553548814        -82.502114249961
34        -108.33263087424        -108.34334738509
35        -133.42271068667        -133.43545280187
36        -157.80638552688        -157.82064350028
37        -181.52196344606        -181.53766201226
38        -204.60553522397        -204.62215070104
39        -227.0894767889        -227.10697395224
40        -249.00461463579        -249.02249956731
41        -270.37858466928        -270.39684540574
42        -291.23789048036        -291.25609630215
43        -311.60634322853        -311.62449545615
44        -331.50687545511        -331.52461381727
45        -350.96016568088        -350.97750043269
46        -369.98617924867        -370.0028162691
47        -388.602998686        -388.61895364147
48        -406.82810883686        -406.84314306758
49        -424.67741562398        -424.69154910401
50        -442.16631694961        -442.17935649972
51        -459.30888047795        -459.32084781779
52        -476.11873190155        -476.12947351954
53        -492.60837663564        -492.61791537281
54        -508.78992512088        -508.79814393297
55        -524.67455014521        -524.68147074968
56        -540.27305388165        -540.27859586945
57        -555.59546808616        -555.59965113373
58        -570.65145973968        -570.65423971143
59        -585.45007909758        -585.45147225199
60        -600        -600
This is a more direct way to evaluate the accuracy (without any particle tracing) by compare the potentials in the PA against the theoretical equation.
This is a lua command and prints a table for the values
of y=30 to 60 of the pa (0,y,0) entries and compares them to the
theoretical result computed in the next column. Small differences between SIMION (left column) and theory (right column) are indicative of SIMIONs accuracy in this example.
This a quick trick to compare simulation with theory and very useful in establishing the simulation accuracy of SIMIONs solution to the Laplace equation.
The example is from a cylindrical mirror analyzer with R1=30 and R2=60 with V(R1)=0 and V(R2)=-600V having its y-axis along the interradial distance (see http://simion.com/info/cma.html ).
Please send in your "discovery" as it will probably be useful to all.
| 
